Big Trades is a volume analysis indicator in ATAS that displays large market buys and sells directly on the chart. It helps quickly identify areas where significant aggressive volume appeared in the trade flow.
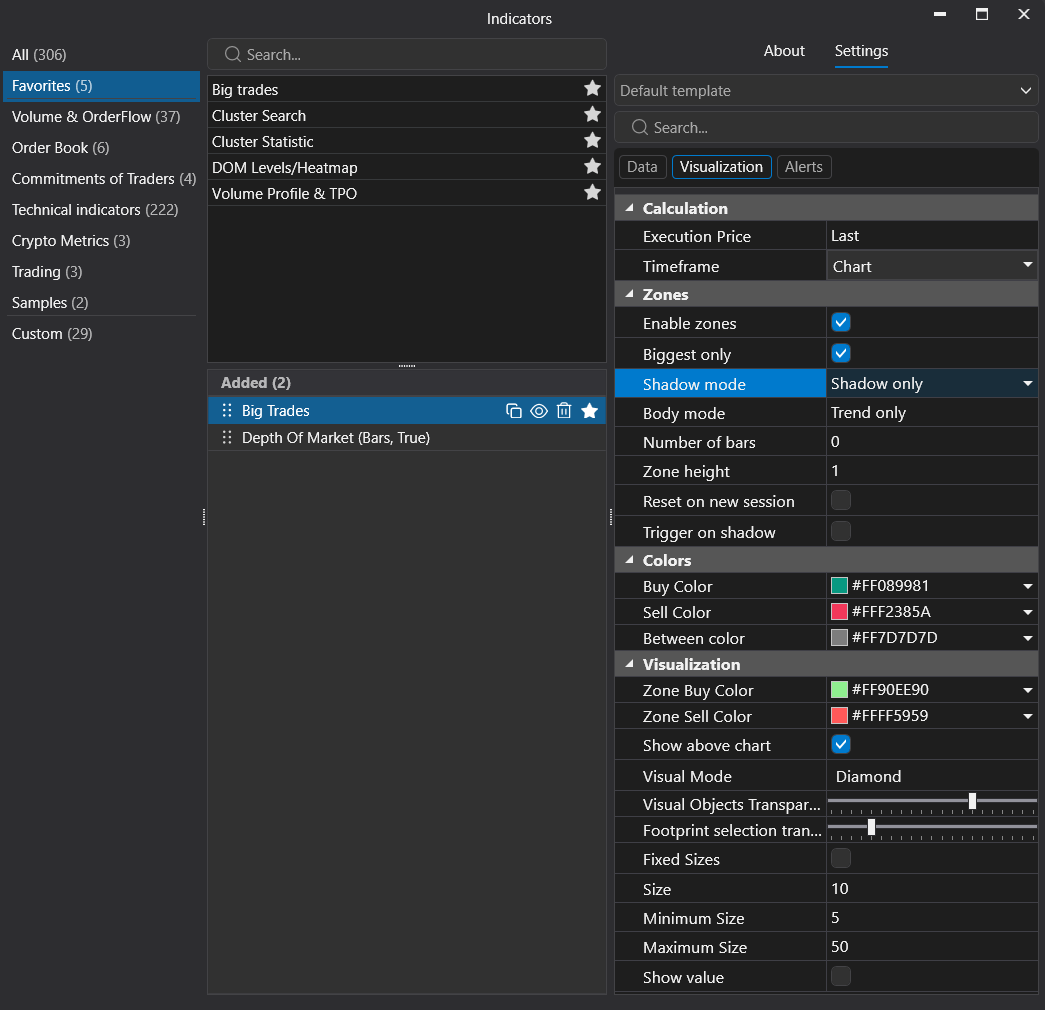
The indicator marks an event on the chart: the time, price, direction, and volume of a large trade or an aggregated group of similar trades.
Big Trades is not a trading signal by itself. It highlights market events that may be worth checking in context: price reaction, nearby levels, Smart Tape, clusters, DOM Levels, Heatmap, volume, delta, and other tools.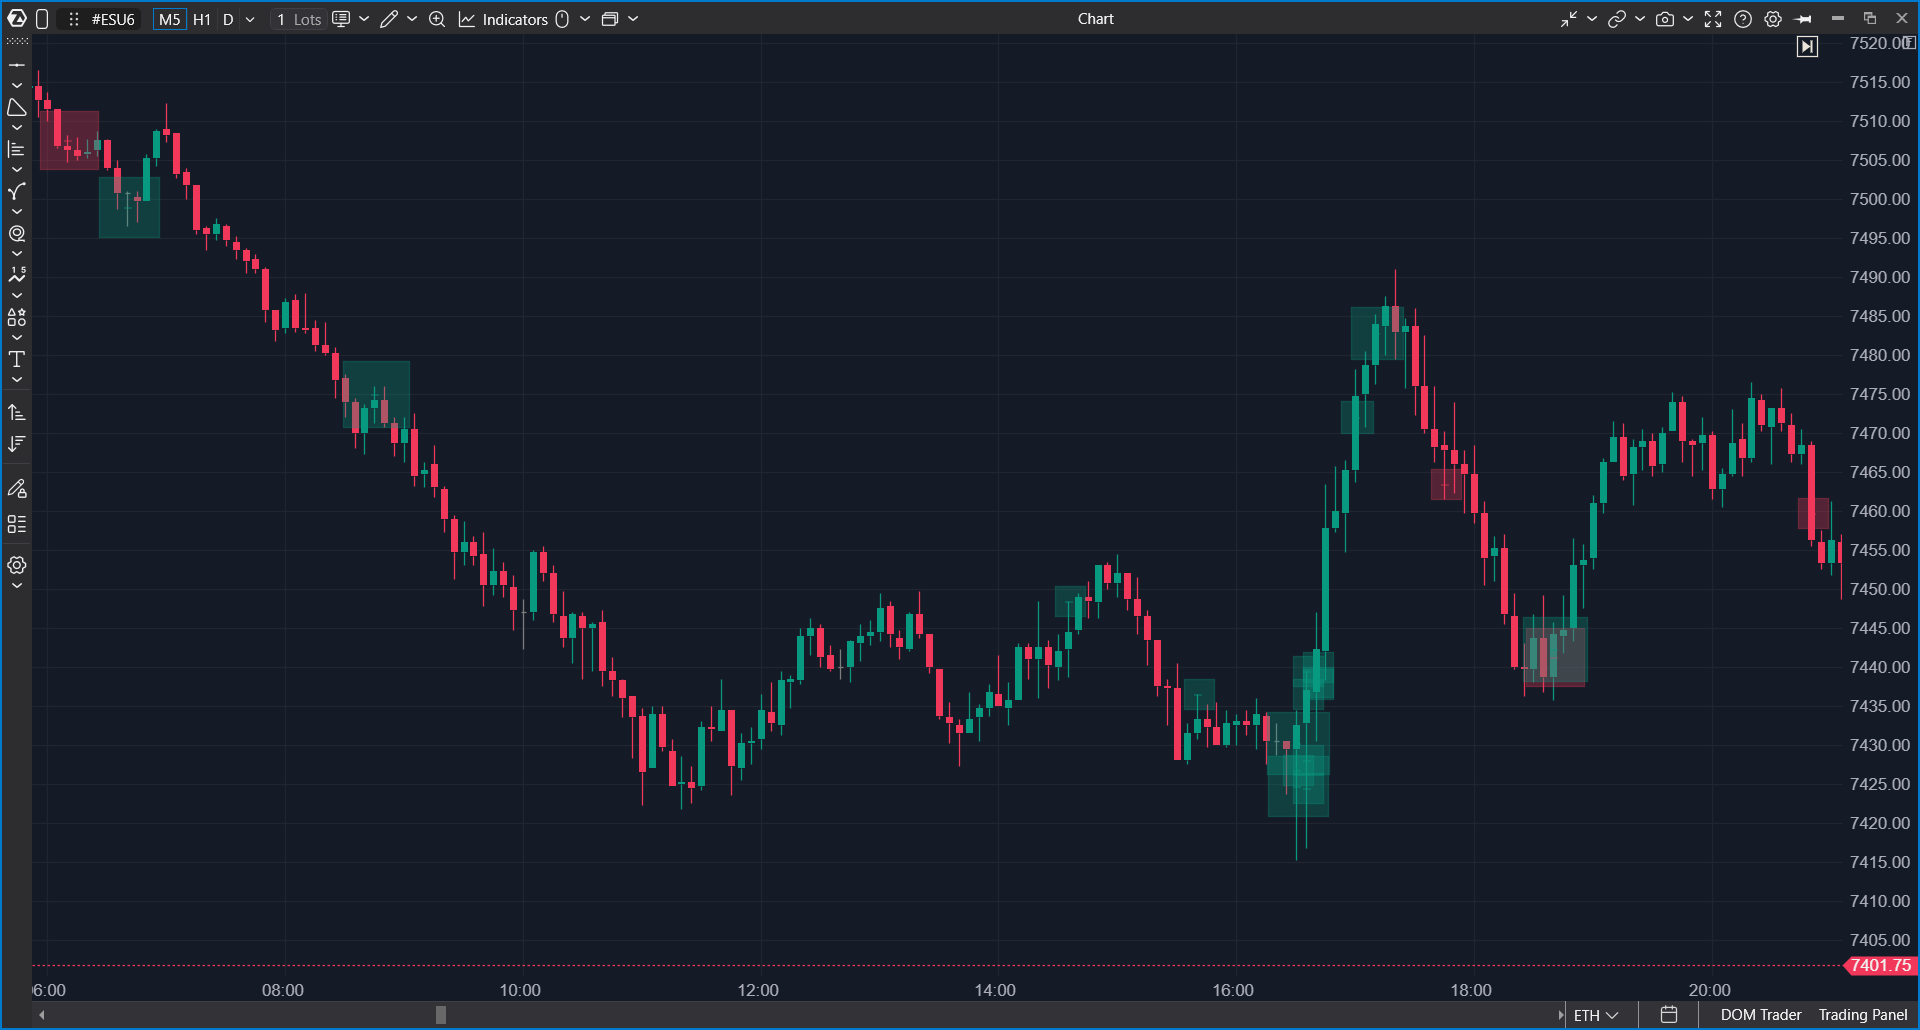
What the Indicator Shows
Big Trades marks large trades on the chart. A marker can help identify:
- where large volume appeared on the chart;
- whether it was a buy, a sell, or a trade between Bid and Ask;
- the trade volume;
- the price or price range where the trade occurred;
- the area of an aggregated trade when the event covers more than one price level.
When hovering over a marker while holding Ctrl, a tooltip appears with additional details. It can show volume, direction, and Bid x Ask data if this information is available for the selected instrument and data feed.
Big Trades can be used as a visual event filter. Instead of manually scanning the entire tape, users can immediately see chart areas where large aggressive volume appeared.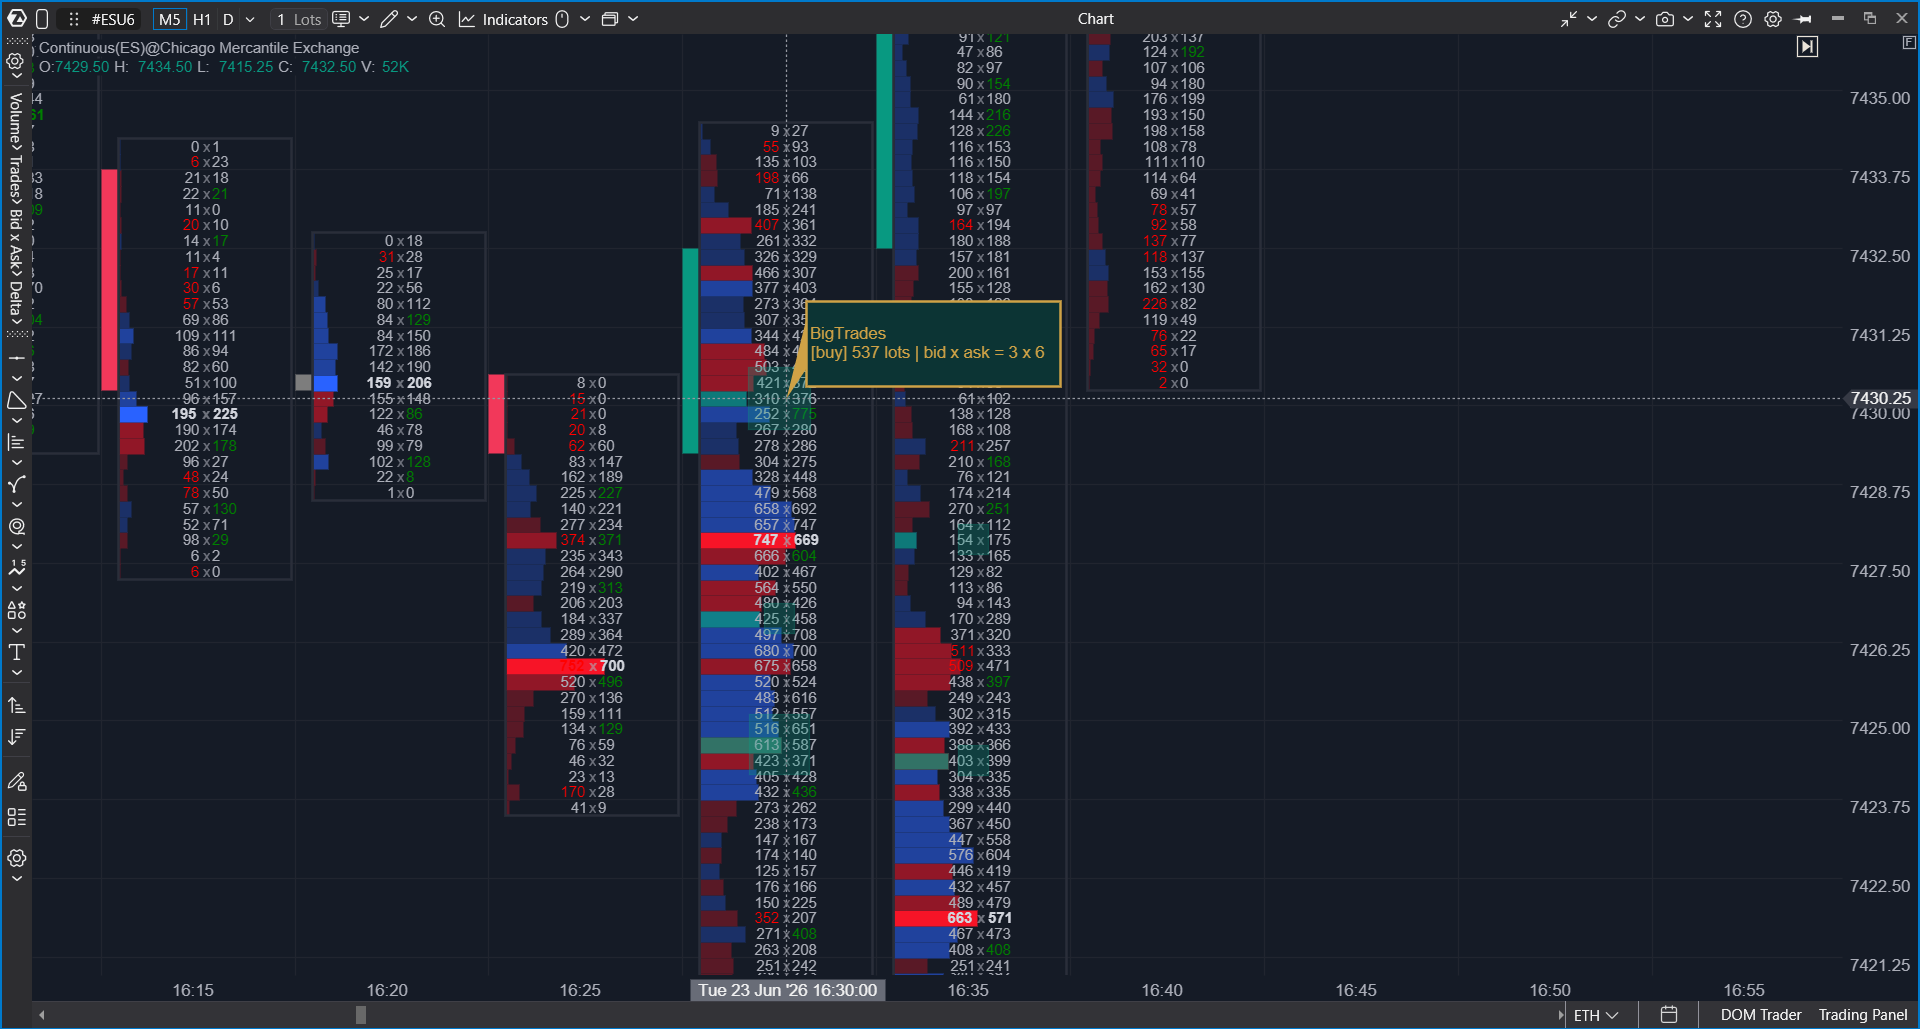
How to Use Big Trades for Analysis
Find Areas of Increased Activity
Add Big Trades to the chart and check where the most noticeable markers appear. This helps quickly identify areas where large volume entered the market.
After that, analyze the context: where the trade happened, whether it appeared near an important level, how activity changed afterward, and whether similar events appeared nearby.
Check Price Reaction
The marker itself only shows that a large trade occurred. The next step is to evaluate what happened afterward:
- price continued moving;
- price stopped;
- price returned back;
- the level of the large trade was tested again later.
This is not a trading rule, but a way to describe the market reaction to the event.
Compare the Event with Smart Tape
Big Trades shows the event on the chart, while Smart Tape helps examine the trade flow around that moment. This can help determine whether it was a single large trade, a series of trades, or part of broader activity.
Distinguish Big Trades from Cluster Search
Big Trades looks for large individual or aggregated trades. Cluster Search looks for areas where a large total volume appeared inside a cluster.
This means the indicators can highlight different events:
- Big Trades can trigger on one large trade;
- Cluster Search can trigger on a series of trades if their total volume meets the condition;
- one indicator may show activity while the other does not.
Main Settings
Big Trades settings are grouped into tabs. The exact set of settings can depend on the selected calculation mode and enabled options.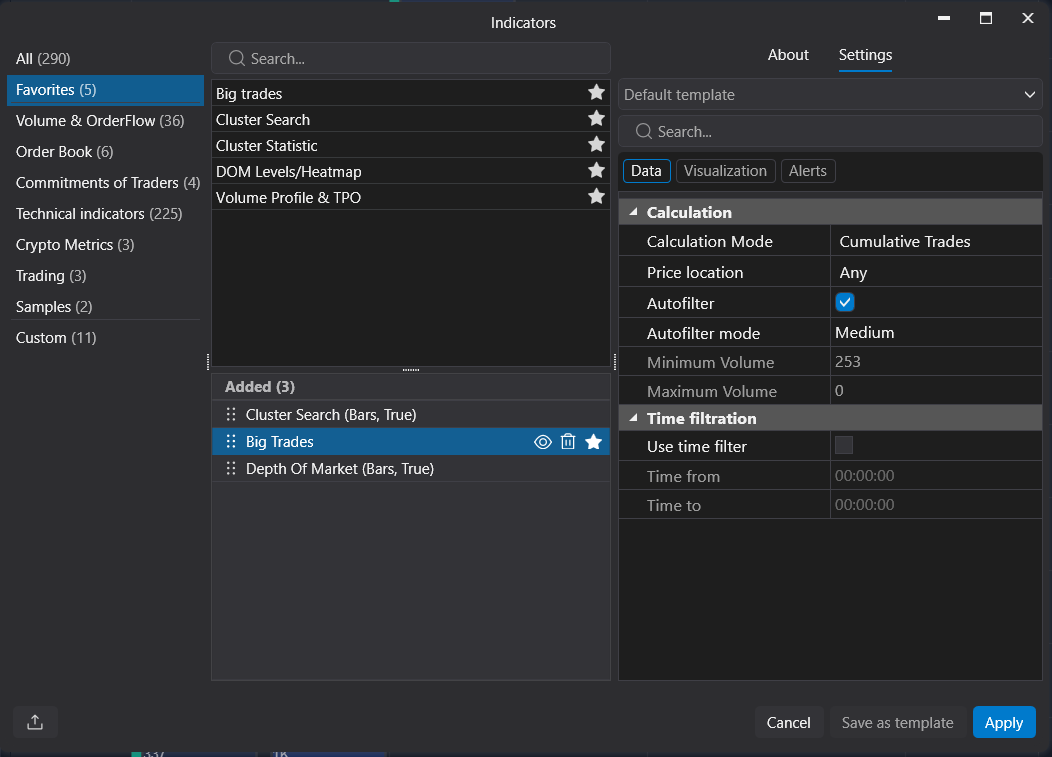
Calculation
Calculation Mode
This setting defines how the indicator processes trades.
- Cumulative Trades - aggregated trades mode. Auto Filter and additional settings for aggregated trades are available in this mode.
- Separate Trades - individual trades mode. In the current platform logic, Auto Filter is disabled for this mode.
If you want to analyze large aggregated market buys and sells, start with Cumulative Trades.
Auto Filter
Auto Filter automatically selects a volume threshold based on the instrument and market activity. In Big Trades, it works in Cumulative Trades mode.
Auto Filter is useful when you do not yet know which volume threshold is appropriate for the selected instrument. The same volume can be large for one market and normal for another, so automatic filtering can provide a better starting point.
When Auto Filter is enabled:
- Min Volume and Max Volume are unavailable for manual editing;
- the indicator uses the automatic threshold;
- Auto Filter Intensity becomes available.
When Auto Filter is disabled:
- Min Volume and Max Volume can be set manually;
- Auto Filter Intensity is unavailable.
Auto Filter Intensity
Auto Filter Intensity controls how strict the automatic filter is.
- Strong - stricter filtering. Fewer, larger trades are shown.
- Medium - balanced filtering.
- Weak - softer filtering. More trades can be shown.
If the chart has too many Big Trades markers, use a stronger intensity. If the chart shows too few events, use a weaker intensity or switch to manual volume filters.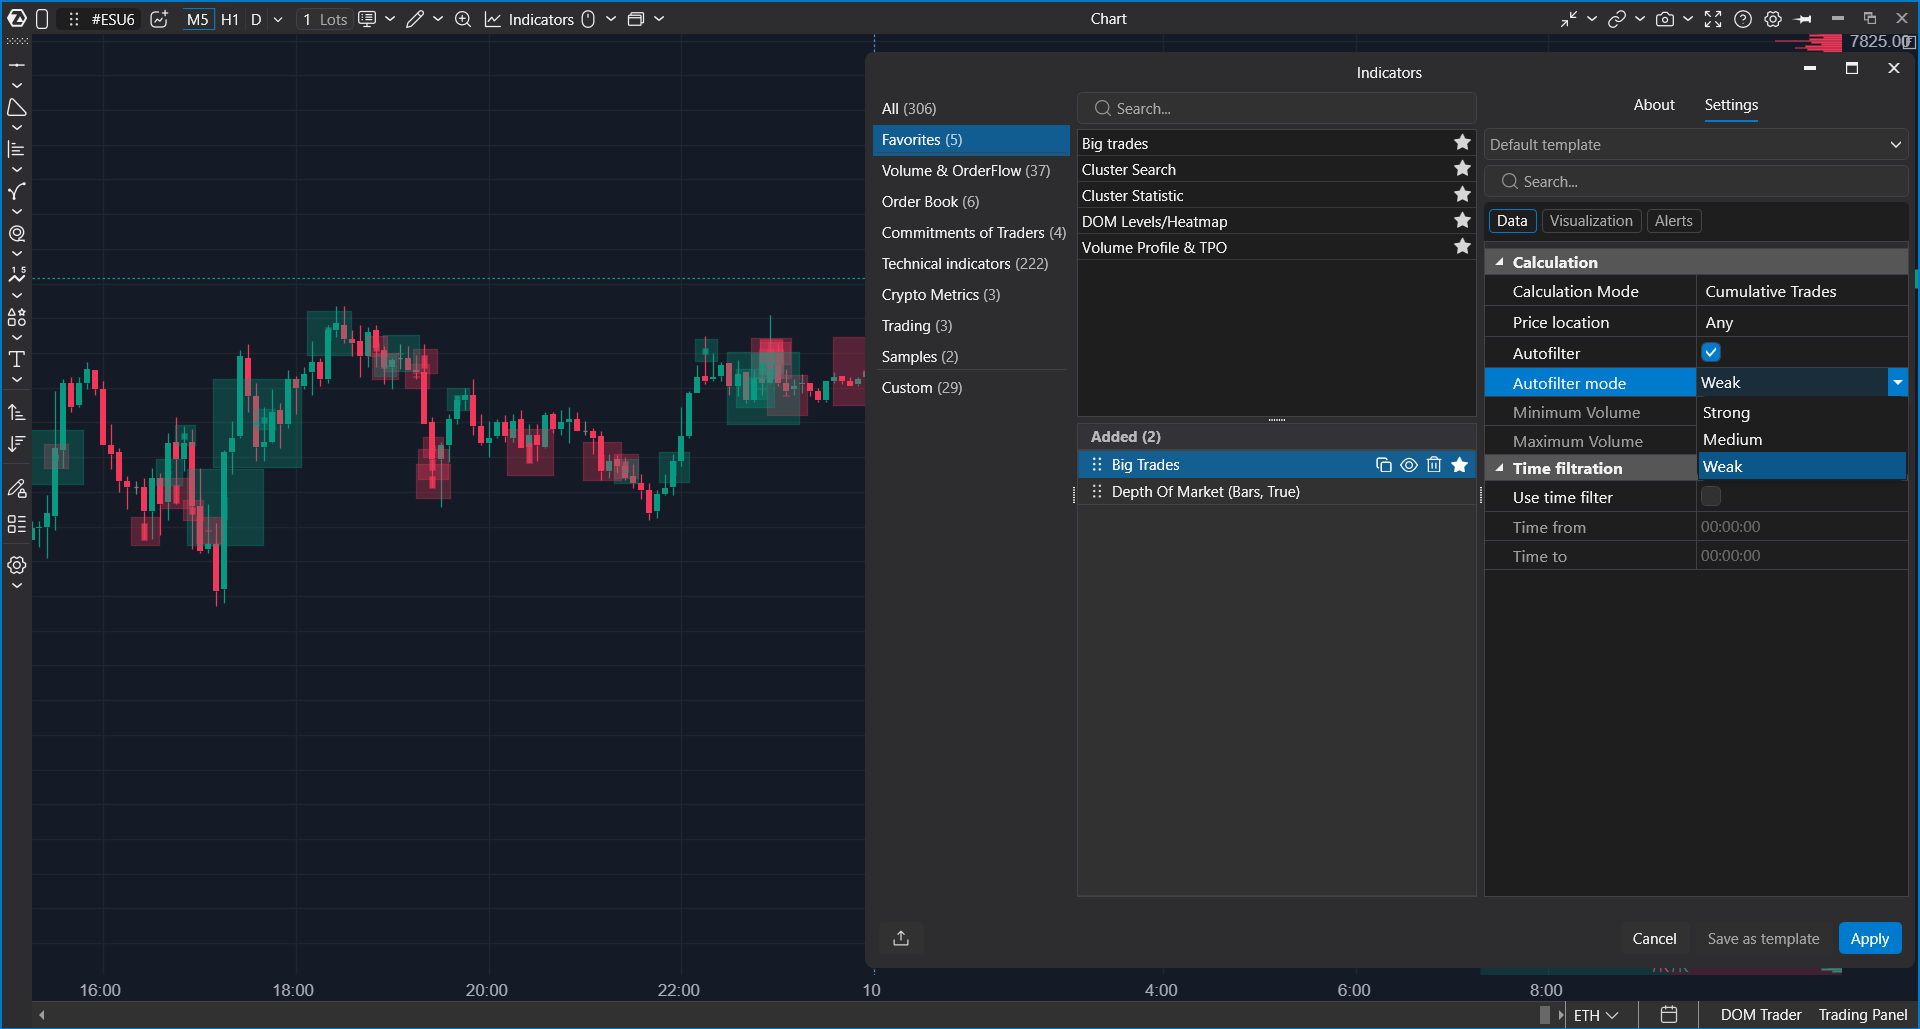
Min Volume and Max Volume
Min Volume defines the minimum trade volume required for a trade to appear on the chart.
Max Volume defines the upper filter boundary. If Max Volume is set to 0, there is no upper display limit.
Manual volume filters are useful when you already know the volume range you want to analyze.
Execution Price
Execution Price defines which price is used to place an aggregated trade on the chart.
This setting is available for aggregated trades and can include:
- Last - the price of the last execution in the aggregated trade;
- Start - the price of the first execution in the aggregated trade;
- Weighted Average - the average price weighted by volume.
Execution Price affects where the marker or zone is placed on the chart. It also affects how the trade interacts with Price Location filters.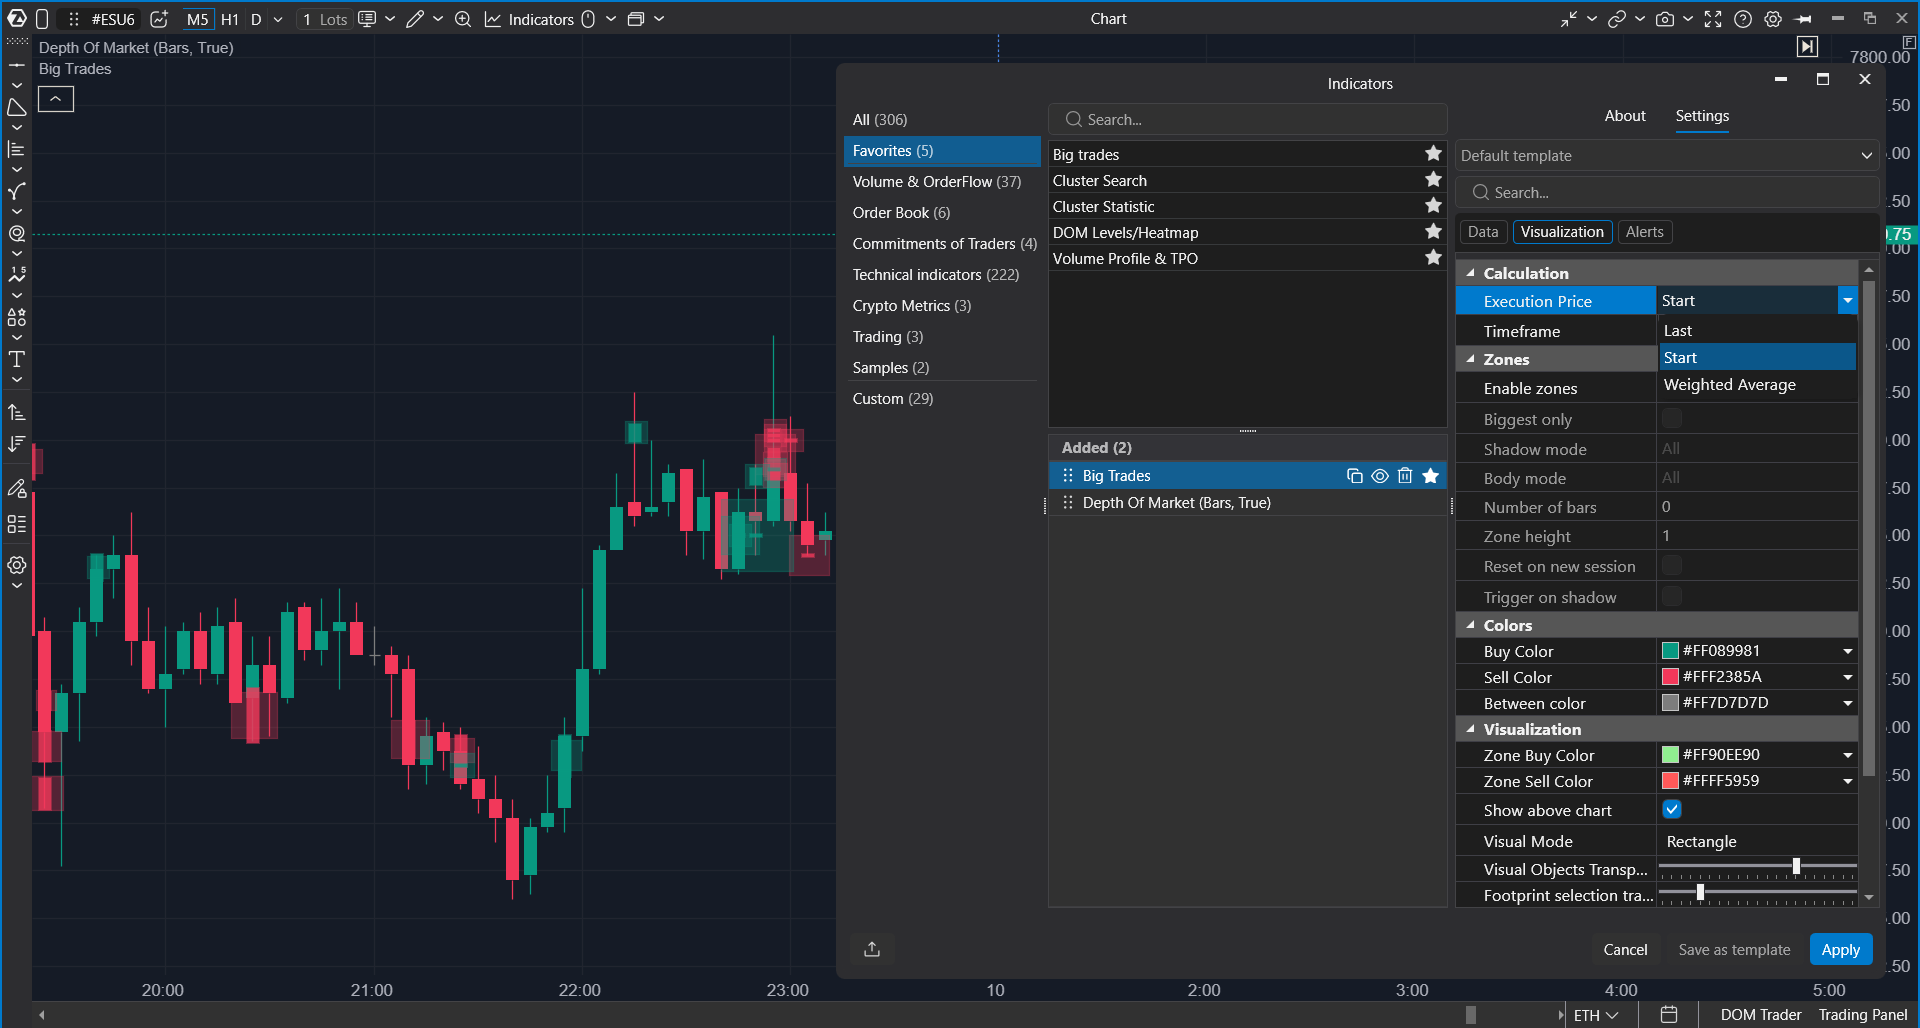
Filters
Price Location
This filter defines where the trade should be located within the candle:
- Any - any location;
- At High - at the candle high;
- At Low - at the candle low;
- Body - inside the candle body;
- Upper Wick - in the upper wick;
- Lower Wick - in the lower wick;
- At High or Low - at the candle high or low.
This setting helps focus on specific event types. For example, users can display all large trades with Any or show only events near the candle High or Low.
When Execution Price is used, the selected execution price is checked against the selected Price Location. If the price does not match the selected location, the object is not shown.
Time Filtration
Time Filtration limits the indicator display by time. Enable Use Time Filter and set Time From / Time To.
This filter is useful for analyzing a specific trading session or selected time window. The current logic supports both a regular intraday range and a range that crosses midnight.
Zones
Zones help visually highlight the price area of a large trade. They are especially useful when analyzing large trades near the candle body or wick, including possible absorption scenarios.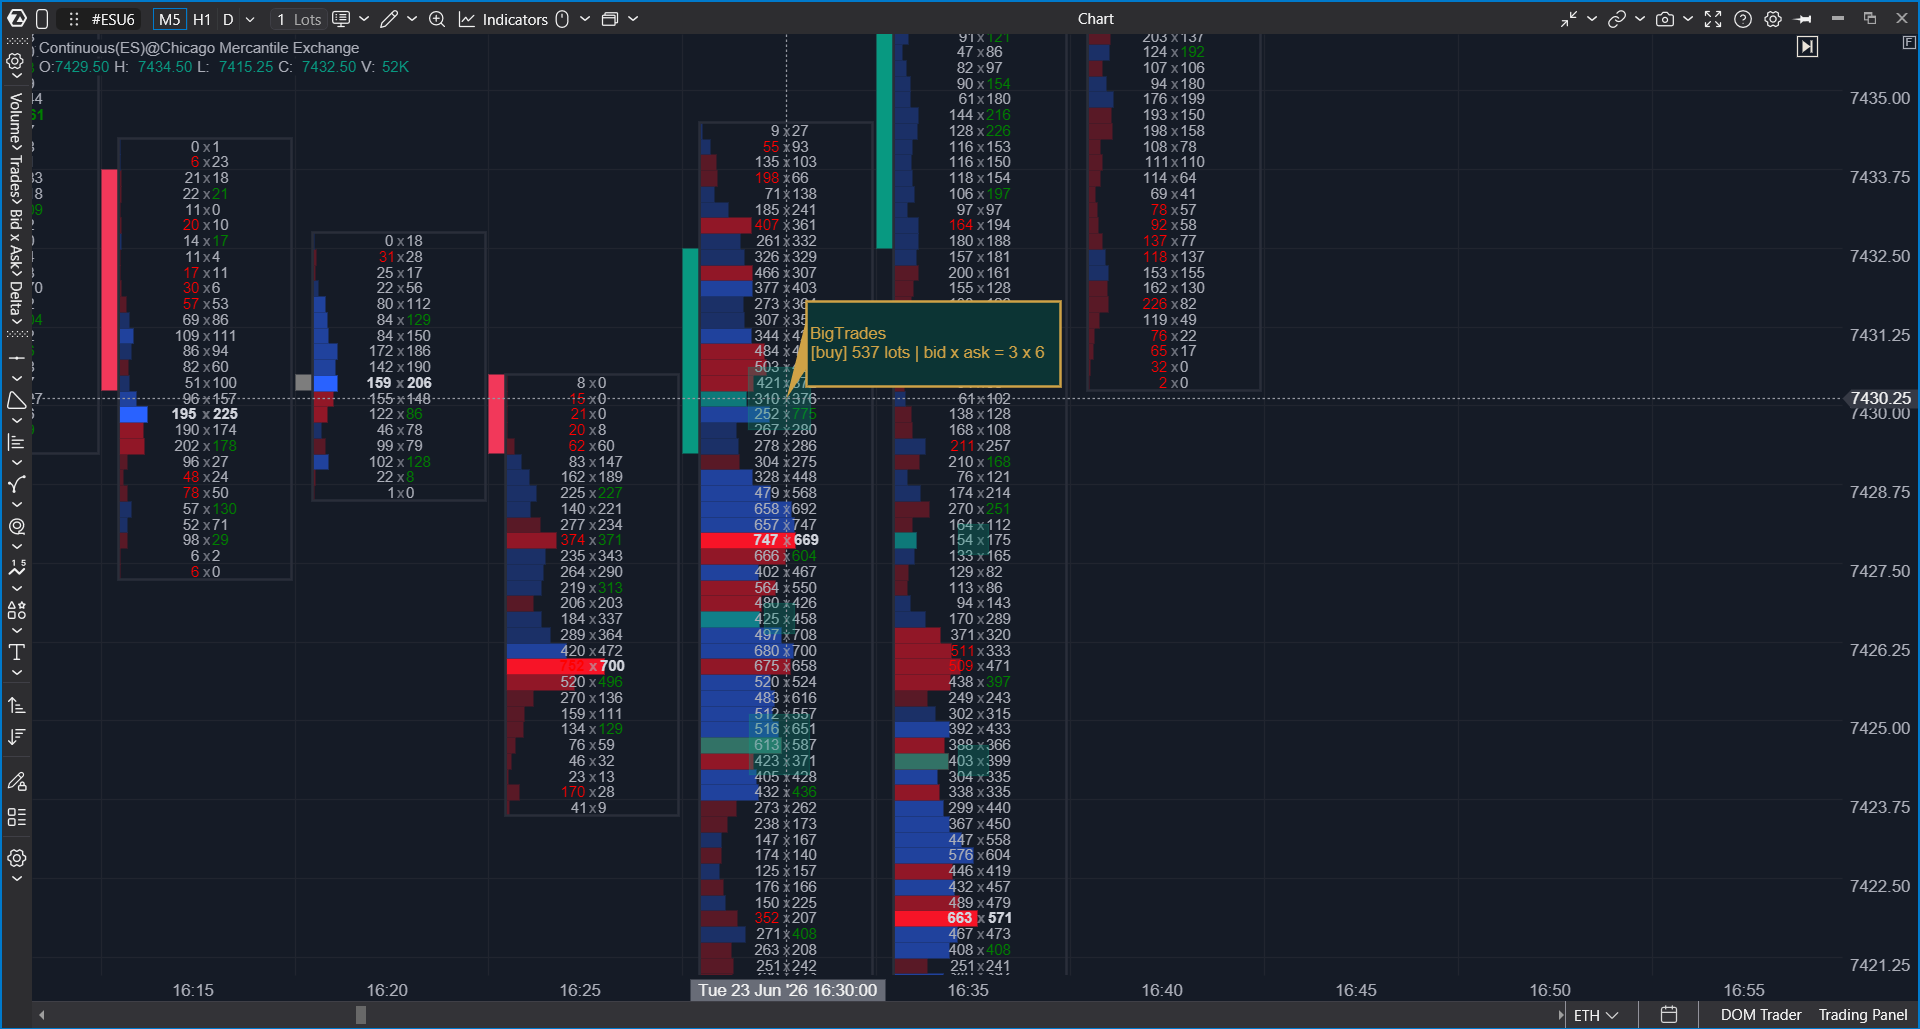
Enable Zones
Enable or disable zone drawing for Big Trades.
When zones are disabled, the indicator shows only regular Big Trades markers according to the selected visualization settings.
Biggest Only
When Biggest Only is enabled, the indicator builds a zone only for the largest qualifying Big Trade inside the candle.
When it is disabled, zones can be built for all Big Trades that match the selected filters.
Shadow Mode
Shadow Mode defines where the trade should appear relative to the candle structure:
- All - the zone can be built for trades in the candle body or wick;
- Shadow only - the zone is built only if the selected execution price is in a candle wick;
- Body only - the zone is built only if the selected execution price is inside the candle body.
Body Mode
Body Mode helps filter how zones are built relative to the candle direction.
Depending on the selected mode, zones can be shown for all matching trades, only trades that follow the candle direction, or only trades that appear against it.
Number of Bars
Number of Bars controls how far the zone extends to the right.
- 0 - the zone extends to the edge of the visible chart area. If session reset is enabled, the zone can be limited by the next session or day.
- More than 0 - the zone extends for the specified number of bars to the right.
Reset on New Session
Reset on New Session removes active zones when a new trading session starts.
This helps keep zones from one session separate from zones in the next session.
Trigger on Shadow
Trigger on Shadow creates a zone only when the Big Trade occurred in the candle wick.
This can be useful when the analysis focuses on wick-related activity or possible absorption near the candle extremes.
Zone Colors
Use Zone Buy Color and Zone Sell Color to configure how buy and sell zones appear on the chart.
Choose colors that remain visible on the current chart theme and do not conflict with candles or other indicators.
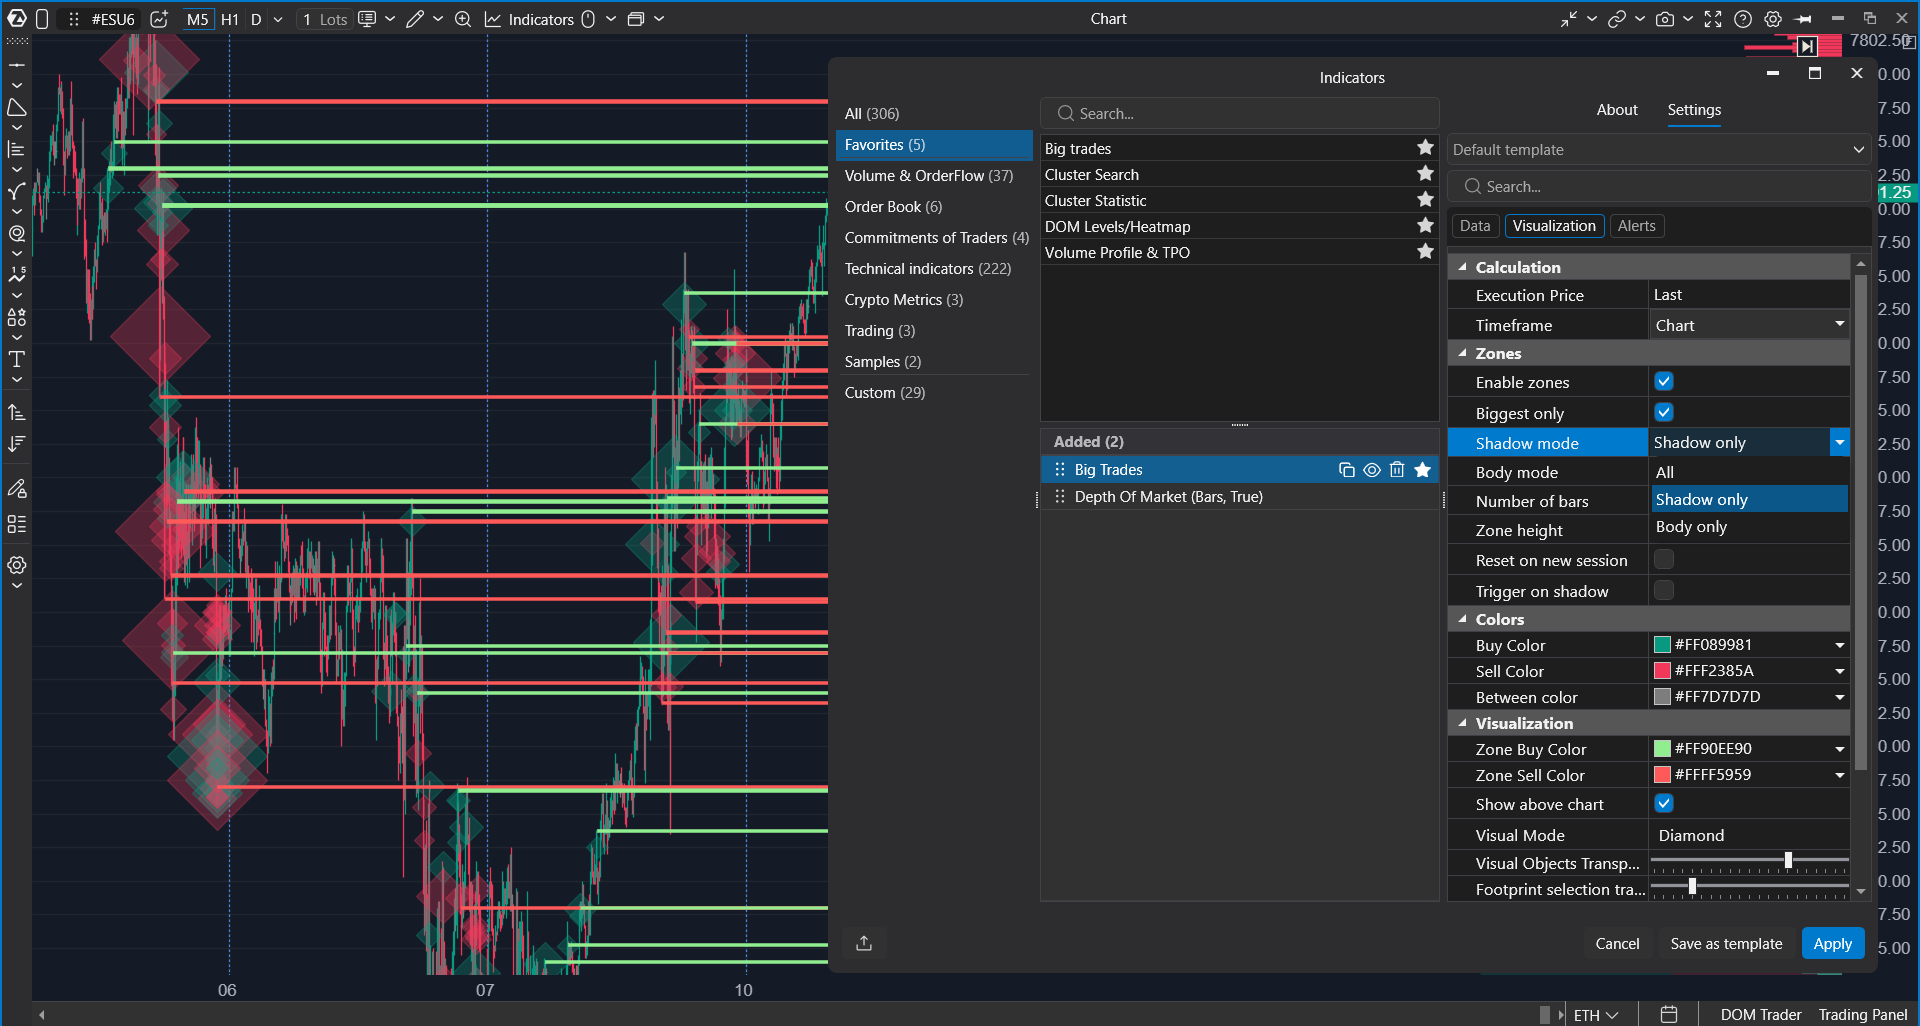
Visualization, Colors, and Alerts
Colors
The Colors section allows you to configure colors for buys, sells, and intermediate trades. It is recommended to choose colors that do not blend into candles or other indicators on the chart.
Visualization
The Visualization section controls how markers look on the chart:
- Show Above Chart - displays objects above the chart;
- Visual Mode - marker shape;
- Visual Objects Transparency - marker transparency;
- Cluster Selection Transparency - price area selection transparency;
- Fixed Sizes - fixed marker size;
- Size - base marker size;
- Minimum Size / Maximum Size - lower and upper marker size limits;
- Show Value - displays volume next to the marker.
If Fixed Sizes is disabled, marker size depends on volume relative to Min Volume, but it is limited by Minimum Size and Maximum Size.
If the chart becomes visually overloaded, increase transparency, disable Show Value, use a stronger Auto Filter Intensity, or increase Min Volume.
Alerts
Use Alerts enables notifications when a new large trade appears in real time. Users can select an alert file and configure the notification background.
Alerts are best used together with an appropriate volume filter so notifications appear only for meaningful events.
Data Loading and Partial Data Warnings
Big Trades relies on trade data. Depending on the selected data feed, chart type, loaded period, and filter settings, the indicator may not be able to display every matching trade over a large historical range.
If the selected period is too large or the filter is too broad, ATAS can limit the result and show only the largest trades. In this case, a partial data warning may appear.
This warning does not mean that the indicator is unavailable in your license. It means the requested amount of trade data is too large for the current conditions.
If you see a partial data warning:
- reduce the loaded chart period;
- enable Auto Filter;
- use a stronger Auto Filter Intensity;
- increase Min Volume;
- narrow the time range with Time Filtration;
- check whether the selected data feed supports the needed trade history.
Historical Big Trades availability can differ between data feeds. For example, some chart/data-feed combinations may support only real-time Big Trades and not historical Big Trades.
Useful Tips
- Start with Auto Filter to get an initial threshold for the instrument, then adjust the filter manually if needed.
- Use Auto Filter Intensity to quickly control how many events appear on the chart.
- Save separate templates for different instruments because the same volume can be large on one market and normal on another.
- If there are too many markers, increase Min Volume, enable Time Filter, increase transparency, disable Show Value, or use Strong intensity.
- Use Price Location to separate trades at candle extremes from trades inside the body.
- Use Execution Price when the placement of aggregated trades matters for your analysis.
- Use Zones when you want to see not only a marker, but also the price area connected with a large trade.
- Check important markers with Smart Tape to see the structure of the event in the tape.
Troubleshooting
Why are there too many markers on the chart?
The filter may be too broad for the selected instrument or period.
Try one or more of the following:
- enable Auto Filter;
- use Strong Auto Filter Intensity;
- increase Min Volume;
- reduce the loaded chart period;
- enable Time Filtration;
- disable Show Value if labels make the chart difficult to read.
Why are there too few markers?
The filter may be too strict for the selected instrument.
Try:
- using Medium or Weak Auto Filter Intensity;
- lowering Min Volume;
- checking a more active trading session;
- verifying that your data feed supports the required trade data.
Why are Min Volume and Max Volume unavailable?
They are unavailable when Auto Filter is enabled. Disable Auto Filter if you want to set the volume range manually.
Why is Auto Filter Intensity unavailable?
Auto Filter Intensity is available only when Auto Filter is enabled in Cumulative Trades mode.
Why does a marker or zone disappear after changing Price Location?
Price Location filters trades by their position inside the candle. If the selected execution price is outside the chosen location, the marker or zone is not displayed.
For example, if Price Location is set to Body, a trade whose selected execution price is in the upper wick will be hidden.
Why do I see a partial data warning?
The requested period or filter can return too many matching trades. In this case, ATAS may show only the largest trades and display a partial data warning.
Reduce the period, narrow the filter, or use Auto Filter.
Why do Big Trades not appear on historical candles?
Historical Big Trades depend on the selected chart type and data feed. Some data-feed combinations provide Big Trades only in real time and do not provide the historical tick-by-tick data needed to build past markers.
Use a compatible real-time data feed and an ATAS chart that supports historical trade data.
Was this article helpful?
That’s Great!
Thank you for your feedback
Sorry! We couldn't be helpful
Thank you for your feedback
Feedback sent
We appreciate your effort and will try to fix the article